Well, it's been a crazy few days here at the start of 2010. Between wrapping up some odds and ends for various side projects, working on the FADE novel, and ironing out the details for my first appearance as a guest at a DOCTOR WHO convention, there's hasn't been time for much else, but I did find time to sign on to some new projects that will keep me booked well into 2011. It's the most work I've ever been offered in one go, but they were all projects I couldn't possibly say 'no' to. As usual, I can't talk about any of them publicly yet, but as soon as they're announced, I'll be posting the news here on the blog.
And for those of you who have been following me on Twitter, I'll be giving all of these projects their own Muppet-themed code names. It's silly, but it's become a bit of a tradition, and a good way to talk about the progress of these assignments without giving away any of the details.
Hope everyone's new year is starting out as well as mine, and here's hoping the rest of the year goes just as well for all of us.
Sunday, January 10, 2010
Friday, January 8, 2010
Upcoming Appearances: Gallifrey One
For anyone interested, I'll be attending the upcoming Gallifrey One convention in Los Angeles, which is being held at the L.A. Airport Hilton from February 26-28. It's their 21st annual Doctor Who convention and they've got a great lineup of guests from the world of Doctor Who, Science Fiction television in general, comic books, and prose. I'll be joining several other DOCTOR WHO comic book creators at the show, including Tony Lee (who's been writing the DOCTOR WHO ongoing for IDW) and Pia Guerra (artist of Y:The Last Man and the DOCTOR WHO: THE FORGOTTEN mini-series). So if you're attending the show or just in the area, stop on by and say 'hello'.
Saturday, January 2, 2010
Work In Progress: Secret Project Sneak Peek
Since I've been working on a lot of secret projects lately, I haven't been able to post any of the art I've been turning out. It's the nature of these kinds of projects. You have to keep it all under wraps, and are usually contractually obligated to do so.
But I wanted to give you a little sneak peak at the art technique I've been playing around with on one of the projects, a fill-in issue for one of my favorite editors, whose shall remain nameless, in case it gives any clues to the project he or she had me working on.
Years ago (longer than I'd care to think about), I used to share a studio with the ridiculously talented Tommy Lee Edwards, who at the time was using a technique that involved shooting reference photos of nearly every figure and background for every panel in his comic, and tracing them onto the page.
It sounds easier than it really was, and a little like cheating to some people, but believe me, there's no cheating involved. Tommy put a lot of work into designing each page, shooting the reference he needed, and putting it all together on a page with a light box, his trusty blue pencils, and a lot natural drawing talent. Tommy had a way of using the photos as the underpining for his drawing that resulted in some of the most stunning comic book art I've ever seen.
So naturally, I've always wanted to steal his technique and try it out for myself.
I've tried that technique out a few times over the years, but it was so time consuming, I usually had to abandon the idea in order to make the deadline. Just getting enough friends together and shooting the reference was prohibitive. And back before Photoshop had become so common and easy to use, you needed a Xerox machine and a lot of patience to size everything so it could be traced on to bristol board before you could start penciling.
But when I was assigned this fill-in, which had a very limited cast and only a few locations, I thought it would be the perfect opportunity to try Tommy's technique for more than just a pinup or a short story.
So here's a peak at how I drew this issue, using the helpfully non-specific first panel as an example.
STEP 1: Layouts
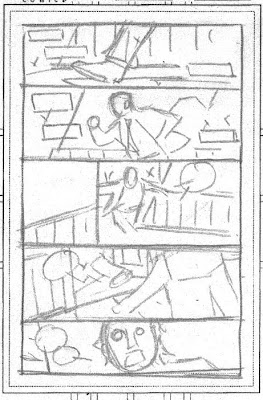
After reading through the script a few times, I always do thumbnail layouts before penciling anything or, in this case, shooting any reference. I won't bore you with all the details, but I spend a fair amount of time laying out a story, picking the shots that I think will tell the story in an interesting way and set the right kind of mood. You'll see that I also plan out where all the balloons can go. I always want to make sure there's enough room for the dialogue, and if possible, to have it flow well with the design of the page. I'll often lay a page out 3 or 4 times before it works the way I want it to.
STEP 2: Photo Reference
After laying out the issue, I got a group of my friends together and shot them in the various poses from the layouts. In the case of this first panel, I used my friend Jonathan Stanley, who I'd cast as one of the book's main characters. That's his foot in the photo.
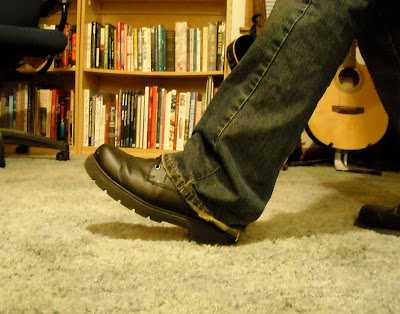
STEP 3: Pencils
After shooting all the reference for the figures in the story, I assembled each page in Photoshop, sizing the reference to approximate the layouts I'd done, and then printed everything out so that I could lightbox it all. I loosely traced the re-sized photographs onto bristol board, and started penciling on top of the tracing. I wasn't going for a photo-realistic kind of look, just a solid underpining to my usual angular drawing style.
I couldn't shoot reference for every background in the issue, so nearly all of the background elements are purely from my own head, but I tried to give them a little more attention so they'd match up with the slightly more detailed figures. Easier than it sounds, though in the case of this panel, I used one of my standard tricks -- wood panelling -- to fill the background and give the shot a sense of place.
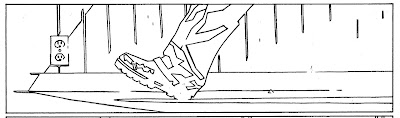
STEP 4: Partial Inks
After everything is penciled, I go back over each line with a black pen so they can be reproduced. In the spirit of the experiment, I tried a new pen this time around -- a Faber-Castell PITT artist pen, size XS. It gave me a slightly flatter and thicker line than my usual Staedtler pens, but held up longer.
You'll notice that I haven't filled in any of the large areas of black, just outlined them in pen. There's a reason for that...
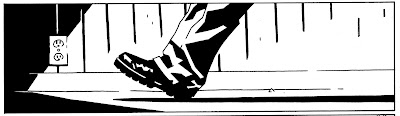
STEP 5: Final Inks
After scanning the b&w linework into Photoshop, I go back and fill the large areas of black with the paint bucket option (always making sure the anti-alias thingy is turned off, 'cause otherwise it doesn't fill it in completely and you get a weird little halo around the linework).
I doubt this technique would work for everybody's artwork, but with the way I draw, with its emphasis on large shapes and very few flourishes, I'm able to fill nearly all the black areas this way, which saves me hours per page. In the old days, I had to fill in the shadows with a big bottle of ink and a brush. With my work, that could take 3 or 4 hours. It takes me about 10 minutes in Photoshop.
After a quick pass to tidy up any smudges or grime that was scanned along with the linework, the page is sent off to my editor, who passes it along to the colorist and letterer, provided there aren't any changes that need to be made
And that's how I drew this entire issue. I'll try and post a few more examples of the final art so you can see how the technique worked in the rest of the book. Can't imagine one foot is much to go on, but I was pretty pleased with the way this one turned out. Still time-consuming, but I'd definitely try it again if the opportunity presents itself.
But I wanted to give you a little sneak peak at the art technique I've been playing around with on one of the projects, a fill-in issue for one of my favorite editors, whose shall remain nameless, in case it gives any clues to the project he or she had me working on.
Years ago (longer than I'd care to think about), I used to share a studio with the ridiculously talented Tommy Lee Edwards, who at the time was using a technique that involved shooting reference photos of nearly every figure and background for every panel in his comic, and tracing them onto the page.
It sounds easier than it really was, and a little like cheating to some people, but believe me, there's no cheating involved. Tommy put a lot of work into designing each page, shooting the reference he needed, and putting it all together on a page with a light box, his trusty blue pencils, and a lot natural drawing talent. Tommy had a way of using the photos as the underpining for his drawing that resulted in some of the most stunning comic book art I've ever seen.
So naturally, I've always wanted to steal his technique and try it out for myself.
I've tried that technique out a few times over the years, but it was so time consuming, I usually had to abandon the idea in order to make the deadline. Just getting enough friends together and shooting the reference was prohibitive. And back before Photoshop had become so common and easy to use, you needed a Xerox machine and a lot of patience to size everything so it could be traced on to bristol board before you could start penciling.
But when I was assigned this fill-in, which had a very limited cast and only a few locations, I thought it would be the perfect opportunity to try Tommy's technique for more than just a pinup or a short story.
So here's a peak at how I drew this issue, using the helpfully non-specific first panel as an example.
STEP 1: Layouts

After reading through the script a few times, I always do thumbnail layouts before penciling anything or, in this case, shooting any reference. I won't bore you with all the details, but I spend a fair amount of time laying out a story, picking the shots that I think will tell the story in an interesting way and set the right kind of mood. You'll see that I also plan out where all the balloons can go. I always want to make sure there's enough room for the dialogue, and if possible, to have it flow well with the design of the page. I'll often lay a page out 3 or 4 times before it works the way I want it to.
STEP 2: Photo Reference

After laying out the issue, I got a group of my friends together and shot them in the various poses from the layouts. In the case of this first panel, I used my friend Jonathan Stanley, who I'd cast as one of the book's main characters. That's his foot in the photo.
STEP 3: Pencils
After shooting all the reference for the figures in the story, I assembled each page in Photoshop, sizing the reference to approximate the layouts I'd done, and then printed everything out so that I could lightbox it all. I loosely traced the re-sized photographs onto bristol board, and started penciling on top of the tracing. I wasn't going for a photo-realistic kind of look, just a solid underpining to my usual angular drawing style.
I couldn't shoot reference for every background in the issue, so nearly all of the background elements are purely from my own head, but I tried to give them a little more attention so they'd match up with the slightly more detailed figures. Easier than it sounds, though in the case of this panel, I used one of my standard tricks -- wood panelling -- to fill the background and give the shot a sense of place.

STEP 4: Partial Inks
After everything is penciled, I go back over each line with a black pen so they can be reproduced. In the spirit of the experiment, I tried a new pen this time around -- a Faber-Castell PITT artist pen, size XS. It gave me a slightly flatter and thicker line than my usual Staedtler pens, but held up longer.
You'll notice that I haven't filled in any of the large areas of black, just outlined them in pen. There's a reason for that...

STEP 5: Final Inks
After scanning the b&w linework into Photoshop, I go back and fill the large areas of black with the paint bucket option (always making sure the anti-alias thingy is turned off, 'cause otherwise it doesn't fill it in completely and you get a weird little halo around the linework).
I doubt this technique would work for everybody's artwork, but with the way I draw, with its emphasis on large shapes and very few flourishes, I'm able to fill nearly all the black areas this way, which saves me hours per page. In the old days, I had to fill in the shadows with a big bottle of ink and a brush. With my work, that could take 3 or 4 hours. It takes me about 10 minutes in Photoshop.

After a quick pass to tidy up any smudges or grime that was scanned along with the linework, the page is sent off to my editor, who passes it along to the colorist and letterer, provided there aren't any changes that need to be made
And that's how I drew this entire issue. I'll try and post a few more examples of the final art so you can see how the technique worked in the rest of the book. Can't imagine one foot is much to go on, but I was pretty pleased with the way this one turned out. Still time-consuming, but I'd definitely try it again if the opportunity presents itself.
Subscribe to:
Posts (Atom)